Set: 32547 Part 1
with Dai Williams
Something that might prove useful to those building the new Meng Fokker F.1 / Dr.1 kit is eduard’s photo etched set 32547.
This set was produced back in 2005 as an update for Roden’s Fokker Dr.1 kit, but many of the parts will be of use to add to detail to Meng’s new kit.
The set comes in two parts.
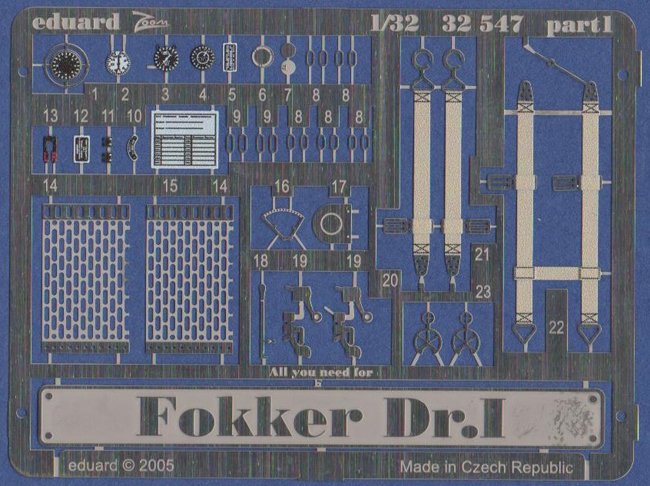
The first fret has a set of pre-coloured seat belts. These are coloured on both sides so there is a reduced risk of any of the underlying metal being visible once the parts are bent to shape.
The fret also holds some very fine cooling jackets for the machine guns along with the cocking mechanisms and the front and rear gun sights. The cocking handles themselves will need to be added using plastic rod. The throttle control is provided along with some pre-coloured instrument faces and some tiny reinforcing points for the areas where the control cables enter and leave the fuselage and wings.
Some extremely small parts are provided to detail the control column, though whether it will be possible or necessary to fit these to either of the control columns in the Meng kit remains to be seen.
There is also a pre-coloured information placard for the rear of the ammunition box and the information plate for the right-hand side of the cowling.

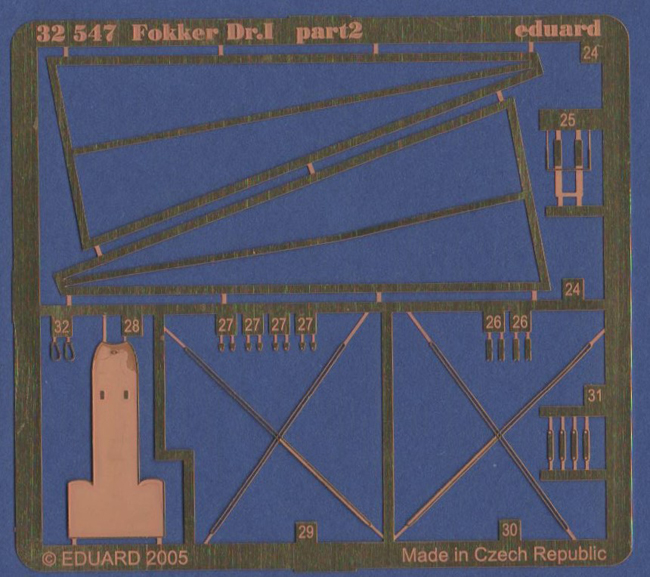
The second fret has the framework for the plywood fairings on the inside of the fuselage. I’m unsure whether or not this framework was missing from the Roden kit for which the set is intended making these parts necessary? There is already some of this framework represented on the inside of the fuselage on the Meng kit. The parts in the eduard set have a rectangular cross section whilst the fuselage on the actual aircraft was constructed of tubes with a circular cross section. Perhaps if you intend to add this detail to the Roden kit or replace the detail already present in the Meng kit, some thin plastic rod might be an easier and more accurate alternative?
The second fret also contains some very delicate paired bracing wires for the inside of the cockpit. Whilst these might well fit the Roden kit. I’m not yet sure if they will conform to the dimensions of the cockpit framework of the Meng kit. Eduard may well have done their homework here, but the drawings that I can find of the interior of the Fokker Dr.1 show only single bracing wires inside the fuselage rather than the paired wires supplied.
This fret also holds a document / map case which is pre-coloured and will require some careful folding when this is bent into shape as a curve needs to be introduced into the part as well as the normal folds.

The instruction sheet is clear and shows where plastic needs to be removed from the Roden kit in order to fit the etched items. Note that the Roden kit may well be different in some respects from the Meng kit and so the work necessary to alter the Meng kit to fit the Eduard parts might be different.
Conclusion
This etched set contains some items that are very small indeed and so a great deal of care will be required when they are removed from the frets and bent to shape. Perhaps cutting them from the fret while it’s inside a clear plastic bag will stop some of the smaller parts launching themselves into space never to be seen again. I think that some prior experience with dealing with etched brass will be useful here and some very fine tweezers will be needed.
I think that this set could prove very useful for those keen to add extra detail to their Meng Fokker Dr.1 as the gun jackets seem to me to be a little more delicate than those provided in the kit and the set provides some items such as the cowling information plate that are not included in the new Meng kit.
Dai W.
SMN Quick summary Star rating out of 5
| FEATURE | STAR RATING |
|---|---|
| Quality of moulding | ***** |
| Level of detail | ***** |
| Accuracy | **** |
| Instructions | ***** |
| Fit of parts | Some adaptation of the Meng kit and / or the parts in the Eduard set might be needed as the set was intended for the Roden 1:32 kit rather than the new Meng kit. |
| Subject choice | **** |
| Overall | **** |
Ask a question or add feedback:
You must be logged in to post a comment.