Decals

After a coat of Future (or Johnson’s Klear in the UK and elsewhere), it’s time for the decals. Because I have taken so long to finish this kit, a couple of third party decal options are now available. However, none of them are any better than the kit options, so I used the Hasegawa decals. In this picture you can see the results of applying Micro Sol (softening agent) to the decal. This is perfectly normal and after 30mins the decal settles back down and snuggles into the panel lines etc.

Decaling is complete. There are actually very few decals on the Draken. I chose an aircraft that did not have the large numbers in white on the wings. I wanted the weathering to be the main feature people notice, not the big numbers!
A step up!

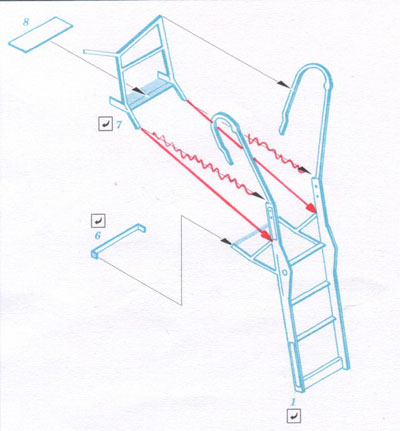
One aftermarket item I did order (and it just arrived) was the Eduard Boarding Ladder (ED48598). It looks deceptively simple here but as I came to find out, it’s VERY delicate.

The main ladder has been removed from the sprue and is ready for careful bending and gluing.

A problem that had me stumped for a while (2 days) was that when I followed the Eduard instructions, the ladder just did not look or fit correctly. Once I compared the instructions to photos of the real ladder I could see what Eduard had got wrong. It’s a simple matter (once you realise) of gluing part 7 lower down on part 1 as per my red arrows.

The ladder assembly is now complete. This was easily one of the most frustrating PE sets I have worked with. It is very delicate and every time I adjusted one part, another would break or come unglued.

The panel wash has now been completed. This was my normal Burnt Umber mix.

Final assembly is now taking place. Here we see the completed cockpit, with a spare parts helmet to add some character.
The final appearance of the top camo scheme, complete with fading, panel lines and oil washes.
