On we go…

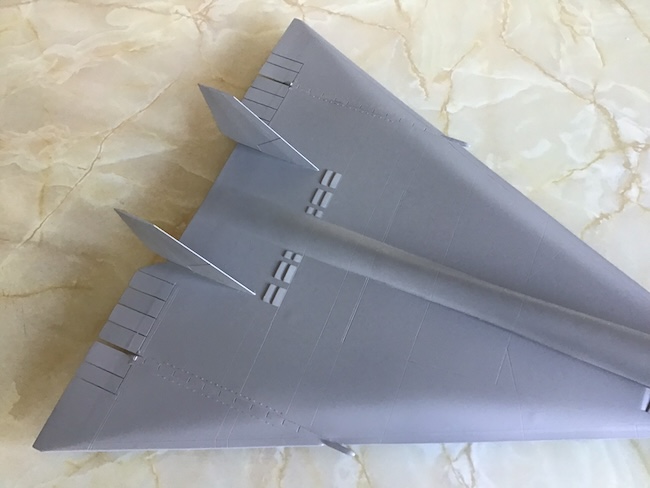
The unprimed folding outer wing sections are now fixed in place. These are comprised of upper and lower pieces and attached to the main wings by means of the horizontal folding rails as shown in the photo.
The kit does include the option for the lowered supersonic position should the modeller choose to display the aircraft in flight. The usual dry-fitting and preparation work was called upon and the resulting seams were filled with Perfect Plastic Putty.
A late change of plan at this stage was to re-scribe the almost negligible raised surface detail on the upper wing and fuselage surfaces. This proved a relatively straightforward task and gives more pleasing and added surface detail to such expansive areas.
The twin vertical fins were then added but the locating tabs and slots needed some filing and sanding to get a satisfactory fit to the fuselage.

A second coat of Mr. Surfacer 1200 Grey applied straight from the rattle can quickly sealed the completed work on the main wings and upper fuselage.

Moving forward the single-piece canards are fixed in position. Prior to this I deepened the flap joins with the scriber so I could set the flaps in a slightly lowered position.

The final challenge of the main assembly process. The canopy glazing and forward screen are a single moulding and commendably clear. The profile of the upper nose area differs considerably and is decidedly pinched. More cosmetic work…

I decided the best course of action was to widen and deepen the forward profile by adding thin strips of plasticard to the sides and a bed of Squadron Green Putty sanded and blended on the top.

The forward contour is now much improved. A touch of Perfect Plastic Putty filled the plasticard seams and a localised coat of primer added.

A size comparison with a Phantom alongside and now for the Valkyrie to enter the paint shop.
Tim Haynes says
Hi Paul,
Your XB-70 is coming along very nicely. Lovely paint job so far..
Paul Ainsworth says
Hello and thank you so much,Tim.She’s getting there now.😉👍
Jonathan Burns says
That’s an excellent article and the model is looking beautiful.
I built this kit. ( the AMT version) a couple of decades ago for Tamiya model magazine and it was a real fight, with very difficult challenges in overcoming fit problems, so I’m very impressed with the superb finish you’ve achieved – many congratulations!
Paul Ainsworth says
Hello,Jonathan – Thank you so much.That’s very kind of you to say.
You obviously know first hand the challenges of the kit.
My congratulations to you for your build and its appearance in that respected magazine.
I don’t think my build is anywhere near the standard required for that but more than appreciate being able to feature my builds here in ‘SMN’.
The final update and photo gallery of the completed model are with Geoff for adding to this feature in due course.😉👍
Tim Haynes says
Great work Paul. The approach you took with the preparation certainly paid off in the end result.
Paul Ainsworth says
“Hello,Tim” – Thank you so much. As you know, preparation is the key with any project and with this kit it’s on a big scale.
I think that’s an off putting factor that goes against this kit equally as much as its physical size.
I can understand and appreciate that but think it’s a shame because with a little thought and input the reward is a model that does justice to this iconic and unique aircraft.😉👍
Rob Ruscoe says
A superb result that shows up your modelling skills. I haven’t built this kit but know people who have and also some that have tried and failed. It just shows that patience and preparation are vital to produce something special. Well done Paul, I hope you are going to enter this in a competition!
Paul Ainsworth says
“Hello,Rob” – Thank you so much.
Yes the kit’s a big challenge and a marathon build in every respect.
Prior to ‘SMN’ and all I’ve learned since I would’ve run a mile from attempting a kit like this.
It’s given me confidence to attempt new aspects of the hobby including ‘weathering’,etc and has increased my enjoyment of the hobby in so many ways.😉👍