Sprues and box
The sturdy box has artwork depicting a TBD-1 overflying an IJN carrier that’s been hit and struggling. Interesting to note the slightly ribbed effect to the panel detail on the box art that you can also see in some wartime images, although this isn’t reflected in the moulded parts within the box.
This ‘stressed metal skin’ effect is one that we have just uploaded to your Techniques Bank, so if you fancy an advanced technique and want to try it out you could consider this Devastator as a test bed; then again, you may think better of it!
Sprues and Detail
The grey sprues are moulded very cleanly with no flash anywhere that I could find.
What’s more, the plastic is very smooth and high quality and should be as easy to work with, similar to Tamiya plastic. Recessed panel lining is about as good as it gets, with fine scribing in all the right places as far as I can see.
The fuselage has plenty of interior detail moulded into the fuselage sides, as well as separate panels and many other small details that should make this area look very busy on the finished model.
Slightly annoying are the multitude of small faint circles caused by the moulding process, some of which are going to be difficult to remove. There is decking to go in the cockpit, so these may end up invisible or at least hard to see, we’ll wait and see in the build.
Furthermore, the engine is well detailed too and the best bits are probably the etched injectors and finely detailed other small additions on the photo etched frets (X2).
Speaking of photo etched metal parts, some other nice items are included. These include: lower forward fuselage doors, seat harness, gun sights, ammunition belts for the rear gunner position; fins and propeller for the torpedo.
The etched metal may have been made by Lion Roar and both Maritime and Armour modellers will probably be familiar with the quality of this manufacturer’s products.
Two options for torpedo are included. Other highlights are the bulged tyres and finesse of the MG’s – really top class tooling.
Open or closed cowl flaps are included and a great option is also of course the chance to display your model with or without folded outer wing panels.
Some nice wing-fold detail is apparent as is the inclusion of white metal wing fold hinges. Open flaps is a good option, but there are those annoying mould pin parks; though they can be remedied simply by adding small section of metal foil over the top to disguise them – simples.
Clear Parts
Two types of canopy are included – multi-part separate sections or one-piece closed option.
Whichever way you go, there is going to take a lot of masking and GWH realise what a chore this would be and have helpfully included a sheet of masks for the window panes – all numbered and clearly identified on the appropriate instruction guide. The transparencies themselves are as clear as I have seen in any kit. Superb.
Decals and painting guide

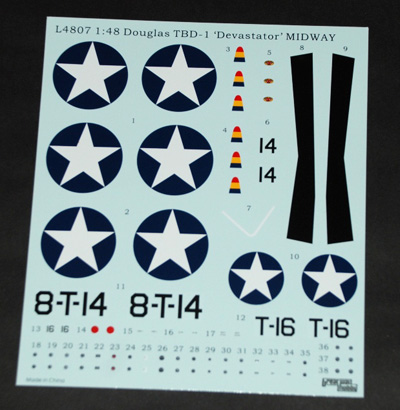
Decals first then – very neatly printed and looks to be high quality and have a glossy appearance.
Carrier film looks minimal and so I’m hopeful that they’ll work well with the usual Micro Set and Sol decal softening solutions.
The TBD-1 included is pretty standard and not the most exciting to look at, yet of course authentic. A pre-war silver/yellow machine would have been good to see. Stencils are included.
The all-colour painting guides are really quite different as they feature aircraft that have been weathered, giving clues as to how you might apply your own weathering.
Hobby Colour, Vallejo and Tamiya paint references are included, but rather odd mixes between the different brands. You will probably want to go your own way and paint to your own taste and brand of paint.
FS numbers would have helped too, only FS36495 is offered for the underside grey panels.
Specific aircraft featured are:
- SBD-1 Devastator 8-T-14, VT-8 aboard U.S.S. Hornet Ens. George Gay
- SBD-1 Devastator T-16, VT-8 aboard U.S.S. Hornet Squadron Commander LCDR John C. Waldron
Instructions
I’m not sure why, but I expected the instruction sheet to be more complex than it is.
On closer examination, each stage is carefully explained with exploded diagrams and illustrations that are clear and seem logical. Etched parts are highlighted in a different colour, which is a good idea that other manufacturers could copy as it makes the assembly process clearer.
In fact, the TBD-1 is quite a simple aircraft in model form and overall the build looks very straightforward. We’ll see!
Conclusion
I reckon that my comments above say it all really. Apart from that very small potential issue with the mould circles on some hard to get at places, it’s hard to fault this kit in any way at all.
Obviously you can follow the build in detail when I get started on this one and that might throw up some issues, but there aren’t any so far.
In terms of value for money, this package is sound as it includes everything that you’ll need to make a superb replica of the Douglas TBD-1 “Devastator”.
I’m looking forward to this one!
Highly recommended
Geoff C


